Visual Inspection
Begin by visually examining the micro SD card. Look for any physical signs of damage such as cracks, chips, or bent contacts. Ensure the gold-plated contacts are clean and free from dirt or corrosion. If using an SD adapter, check its physical condition as well, including the lock switch.
Basic Functionality Test
Insert the micro SD card into a known working and compatible device, such as a smartphone, camera, or computer with a card reader.
- Observe if the device recognizes the card.
- Attempt to browse any existing files or save a new small file to it.
If the card is not detected or basic read/write operations fail, there might be a significant issue.

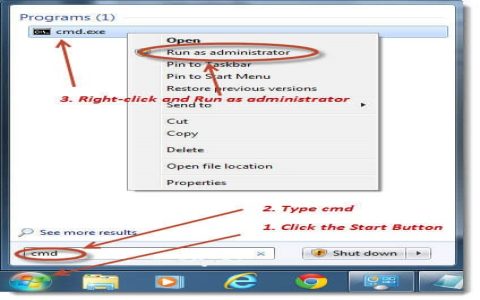
Using Operating System Tools
Your computer's operating system provides built-in utilities for basic card diagnostics.
Windows:
- File Explorer: Check if the card appears as a drive and if the reported capacity seems correct. Attempt to open, copy, or delete files.
- Disk Management (*): Verify the card's status, partitions, and file system. You can format the card or assign a drive letter here.
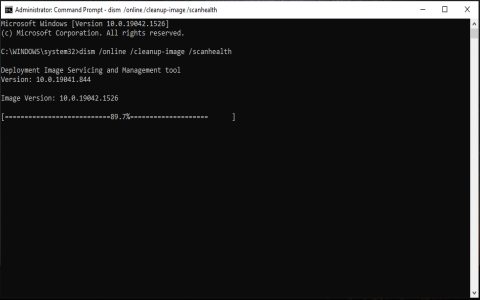
- CHKDSK: Open Command Prompt as Administrator and run `chkdsk X: /f /r` (replace X with the card's drive letter). This tool checks for file system errors and scans for bad sectors.
macOS:
- Finder: Check if the card mounts on the desktop or in the Finder sidebar.
- Disk Utility: Use "First Aid" to verify and repair the disk. You can also check S.M.A.R.T. status (if the reader supports it) and reformat the card.
Linux:
- Command Line: Use `lsblk` or `sudo fdisk -l` to list block devices and identify the card.
- fsck: Use `sudo fsck /dev/sdXN` (replace sdXN with the appropriate device partition, e.g., sdb1) to check and repair the file system. Ensure the partition is unmounted first.
Dedicated Diagnostic Software
For more comprehensive testing, specialized third-party software is recommended. These tools can perform:

- Full Capacity Verification: Writes data to the entire card and reads it back to confirm the true usable capacity. This is crucial for detecting counterfeit cards that falsely report a larger size.
- Read/Write Speed Tests: Benchmarks the card's sequential and random read/write speeds to ensure it meets its advertised specifications (e.g., Class 10, UHS-I U3, V30).
- Error Scanning: Conducts thorough surface scans to identify bad sectors or data integrity issues across the entire storage area.
Such software typically involves writing test patterns and verifying them, which can be time-consuming but provides a detailed health report.
Key Aspects to Verify
When checking your micro SD card, focus on these critical aspects:
- Authenticity and Capacity: Ensure the reported capacity is genuine. A common issue with counterfeit cards is a much smaller actual capacity than advertised.
- Read/Write Performance: Verify that speeds are adequate for your intended use (e.g., 4K video recording, high-speed burst photography).
- Data Integrity: Confirm that data written to the card can be read back accurately without corruption.
- File System Health: Ensure the file system is intact and free of errors. If errors are found, formatting (after backing up data, if possible) might be necessary.
Troubleshooting Common Issues
If you encounter problems:
- Card Not Recognized: Try a different card reader, USB port, or device. Clean the card contacts. Ensure the card reader drivers are up to date.
- Read/Write Errors: The card might be corrupted, physically damaged, or nearing the end of its lifespan. Check if the lock switch on an SD adapter is engaged. Attempt to format the card (this will erase all data).
- Slow Performance: Ensure your card reader and host device support the card's speed class. A slow reader can bottleneck a fast card. Test with diagnostic software to confirm actual speeds.